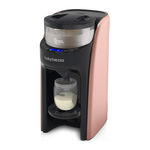
Baby Brezza Formula Pro Advanced - Dispenser Machine Manual

Please read fully to ensure your Formula Pro' Advanced works properly every time.
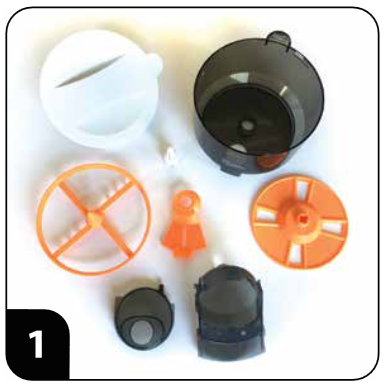
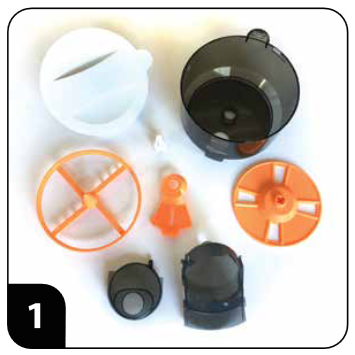
Disassemble and wash all parts (except the base) and dry thoroughly.

Disassembly tip:
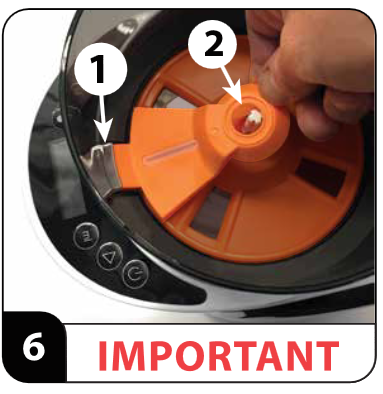
To remove the Stirring Wheel, grasp it as shown above & pull up while holding the powder container down.
Never clean the Powder Container in a dishwasher, sterilizer or microwave!
Set-up instructions
Set-up and cleaning videos available at babybrezza.com/video.
- After hand washing these parts, make sure they are all completely dry before assembly.
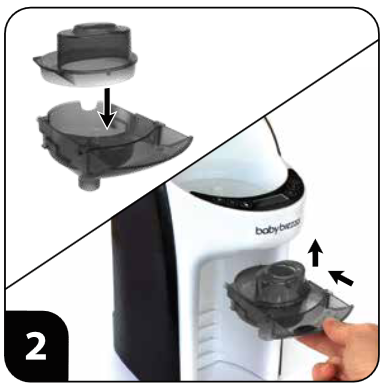
- Assemble the funnel & funnel cover. Then Insert funnel assembly into funnel compartment by sliding it up, then in.
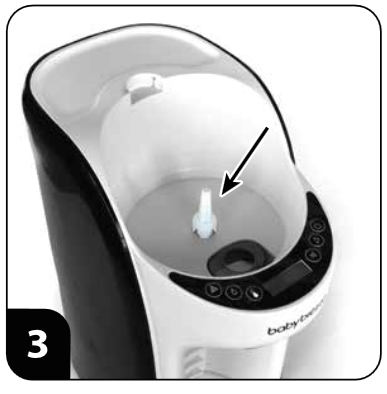
- Place the axle on the base as shown.
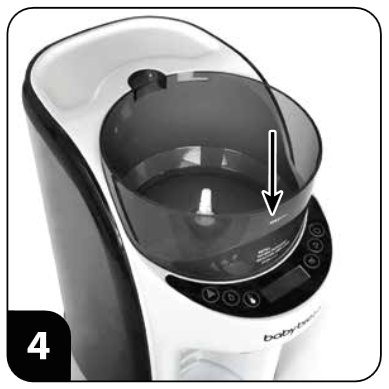
- Now place the powder container on the base with the printed markings facing you.
- Place the measuring wheel into the powder container, fitting it over the axle with the flat side facing down. Make sure the holes in the measuring wheel are in the same position as shown above.
- Place the front edge of locking cover in the recess in the inside/front of the powder container, UNDER THE TAB.
- Fit hole in locking cover over top of axle. It will not lay completely flat.
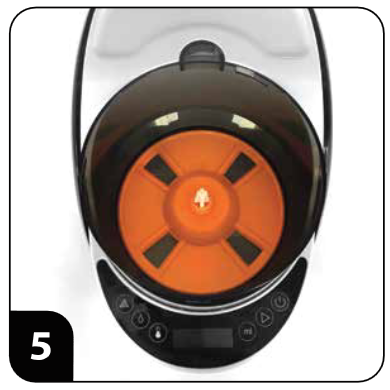
- Make sure the locking cover & measuring wheel look like this when assembled.
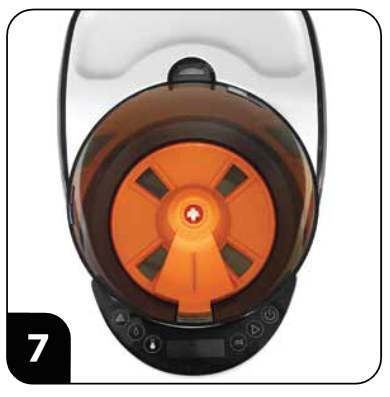
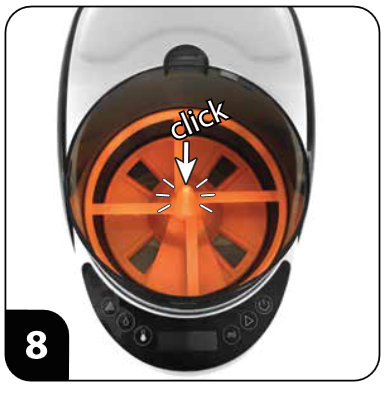
- Now place the stirring wheel on the axle and push down firmly until you hear a click. Make sure the stirring wheel is snapped in place and does not lift up easily.
Now you're ready to add powder and make your first bottle.
Preparing your first bottle
- Carefully pour formula powder into the powder container. Wipe up any spilled formula powder.
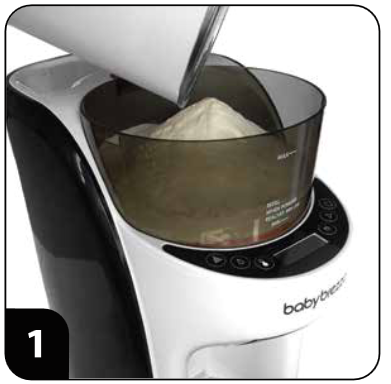
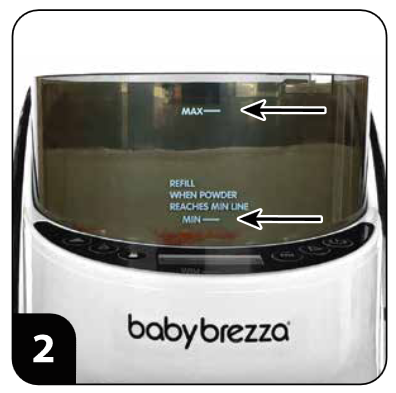
- Make sure that the powder is filled between the MIN & MAX lines on the powder container.
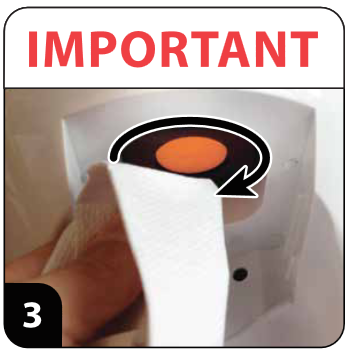
- Place the powder container lid on the powder container and turn clockwise until it stops. This will engage the safety switch & lock the powder container onto the base. To remove the powder container, turn the lid counter-clockwise.
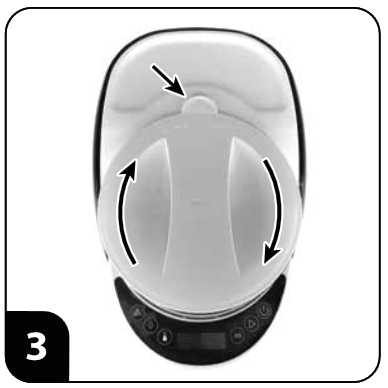
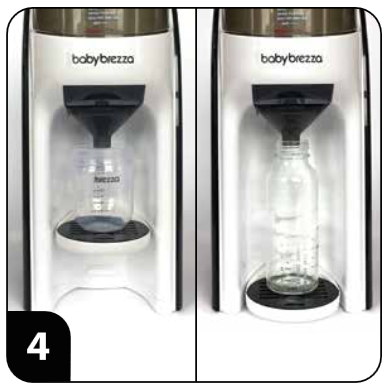
- Fit the drip tray on the base to fit your bottle height. Adjust it so the mouth of the bottle is as close to the funnel as possible. Push the drip tray firmly against the base to set it in place.
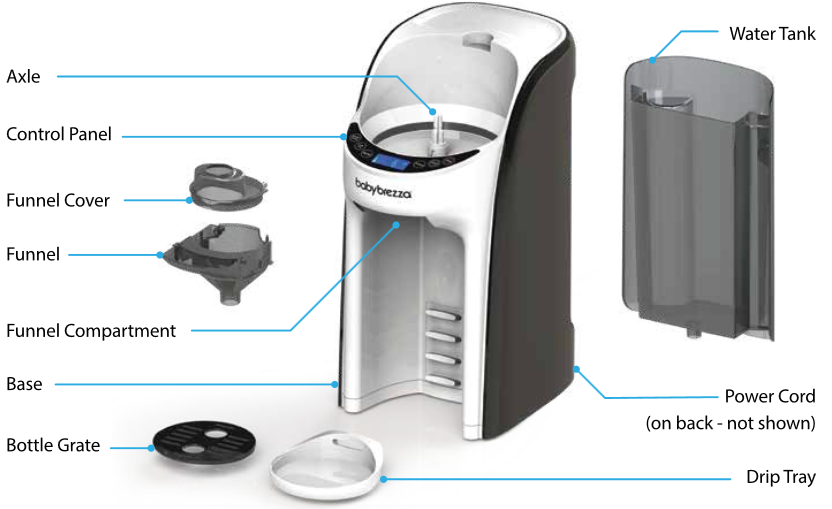
Formula Pro®Advanced - controls & operation
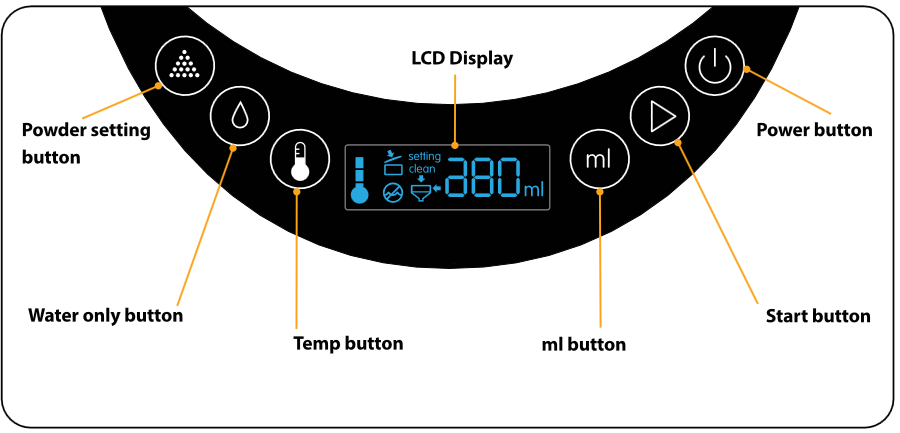
LCD Display: Shows selected functions & warnings
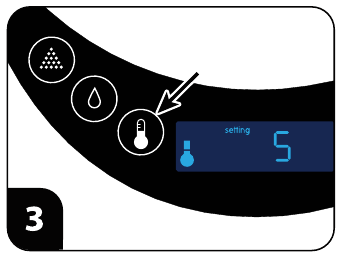
Powder setting button: Press to select setting number for your formula brand and type.
Water only button: Press to dispense ml displayed on LCD (selected by the "ml" button).
Temp button: Press to select your warming temperature.
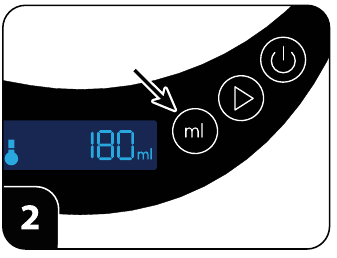
ml button: Press to select ml of water dispensed.
Start button: Press to start dispensing formula.
Power button: Press to turn unit on or off.
Temperature indicator symbols
 | = Room temperature |  | = Body temperature |  | = Slightly warmer than body temperature |
Powder & water settings
 | Powder Setting Indicator - Use the "powder setting" button to chose your powder setting 1-10. |
 | ml Indicator - Use the "ml" button to choose how many ml of water to mix with powder. 60, 30, 90, 120, 150, 180, 210, 240, 270, 300 ml of water are available. There is no option to make a 30ml bottle. |
Warning symbols
The Formula Pro® Advanced will not run if any of these symbols are illuminated on the LCD display.
 | Powder Lid Open - The powder container lid is not closed completely or is not on the powder container correctly. Close the powder container lid completely and correctly when this symbol is illuminated. |
 | Low Water - Refill water tank when this symbol is illuminated. |
 | ~=Clean Funnel - This symbol will illuminate after every 4 bottles are made. When this symbol is illuminated, remove funnel assembly, wash, and dry completely, then place it back into the base. |
 | Funnel Out - Funnel is removed or not inserted completely. Make sure the funnel is pushed all the way in when this symbol is illuminated. |
Make sure your Formula Pro® Advanced is plugged in.
- Press the "powder setting" button repeatedly to select your setting 1 - 10.
It is essential that you choose the correct setting for your formula brand and type.
Go to babybrezza.com/FPA to find the correct setting for your formula powder.
- Press the "ml" button repeatedly to select the ounces of water you want to dispense.
ml size indicates water volume only. It does not include the volume of powder added when mixing.
- Press the "temp" button to select temperature.
 | = Slightly warmer than body temperature |
 | = Body temperature |
 | = Room temperature |
The temperature indicator will flash when heating and will stay solid when the set temperature is reached.
Press the "start" button to dispense formula.
The formula pro will remember the setting & ml size even if it is unplugged. You do not need to select a powder setting every time you make a bottle. You can always change the nl size or powder setting by pressing the buttons again.
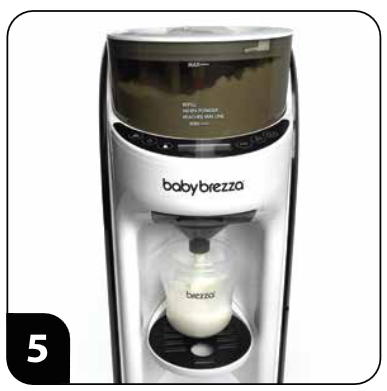
 The Formula Pro® Advanced will dispense powder & water together, then stop automatically when dispensing is complete. Some clumping may occur with some formula powders inherently difficult to mix with water.
PLEASE NOTE: The level will appear higher than the ml size selected because of added powder volume and/or variance in bottle markings.
Example: 120ml of water plus powder volume is approximately 135ml depending on your formula powder type.
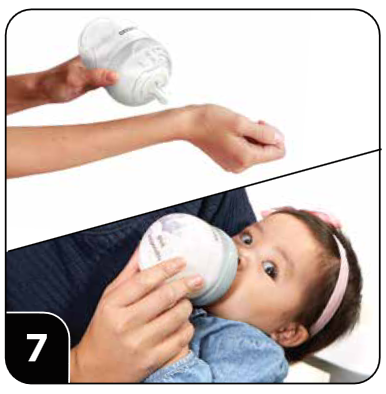
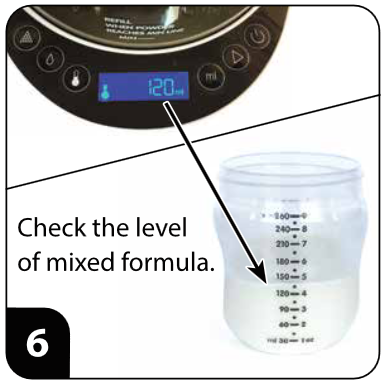 Check for clumps and shake or stir the bottle if necessary. Check temperature and feed your baby.
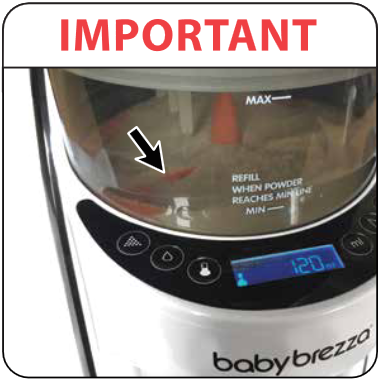
Refill the powder when the arms of the stirring wheel become visible. This is very important for accurate formula measuring.
Daily Cleaning Instructions
It is EXTREMELY IMPORTANT to clean the funnel after every 4 bottles made.
This will keep your Formula Pro® Advanced dispensing accurately. Always make sure Funnel & Funnel cover are COMPLETELY DRY before re-assembling.
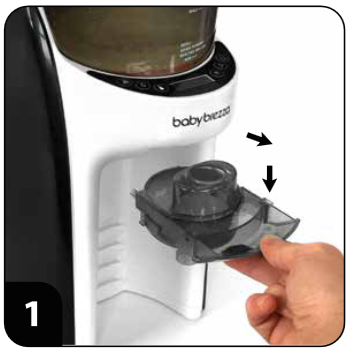
- Remove Funnel & Funnel Cover by pulling out and down.
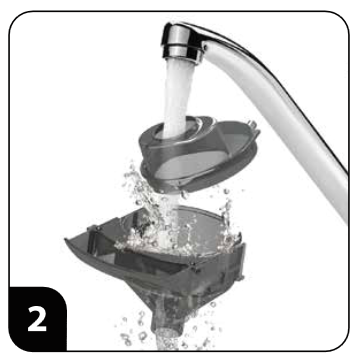
- Wash Funnel & Funnel Cover with warm, soapy water & rinse well.
Dry completely before re-installing.
- Wipe the powder-dispensing hole on the underside of the powder container using a dry paper towel or soft dry cloth.
- Wipe any spilled powder off the base.
PLEASE NOTE: You don't need to remove the powder container or the powder container parts for daily cleaning.
Monthly Cleaning Instructions
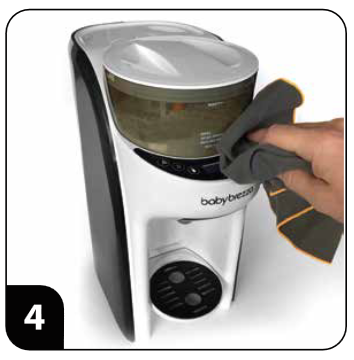
Once a month, give your Formula Pro® Advanced a thorough cleaning.
Please watch set-up and cleaning videos at babybrezza.com/video.
- Hand-wash all parts shown above with warm soapy water, rinse well and dry thoroughly.
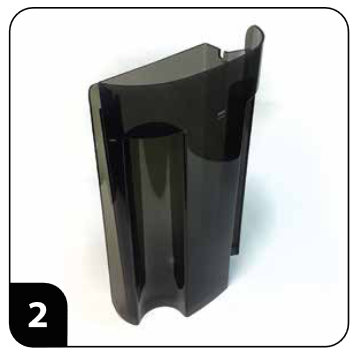
- Hand wash water tank with warm soapy water, rinse well and dry thoroughly.
Monthly Descaling Instructions
You can leave the formula powder in the powder tank during the descaling process.
To prevent mineral scale on the water heater inside your Formula Pro® Advanced, follow these easy steps:
- Remove the water tank, empty it and fill it with 600ml distilled vinegar & 600ml of purified water.
- Place the water tank on the base of the machine & place a cup larger than 300ml under the funnel.
- Select "300ml" with the "ml" button, then press the "water only" button to dispense.
- Empty the cup, place back under the funnel, then press the "water only" button again to dispense another 300ml.
- Now unplug the machine, remove the water tank, and empty it. Let the machine sit for 4 hours.
- Wash, rinse and fill the water tank to the max line with purified water, then place it back on the base.
- Plug in the machine, place a cup to catch 300ml water and use the "water only" button to run an 300ml cycle. Dispose of the water dispensed in the cup and then repeat this step to run the entire tank of purified water through the machine. When the "Low Water" indicator turns on, you're done rinsing.
- Refill the water tank with purified water and return to normal use.
Long Term Storage Instructions
It is EXTREMELY IMPORTANT to clean the machine and remove all formula powder residue before storage.
If you're going to store your Formula Pro® Advanced for later use, or will not use it for a while, please follow the instructions below:
- Remove the powder container parts, funnel, funnel cover, drip tray and water tank from the base.
- Wipe the base with a clean damp cloth and make sure to remove any and all formula residue. Dry the base well.
- Empty the powder container, wash all powder container parts, dry throughly, reassemble, & reinstall on the base.
- Follow the Monthly Descaling Instructions, steps 1-7 only. Do not remove or refill the water tank after step 7.
- Now place a cup to catch 300ml water under the funnel, then press & hold the "water only" button for 5 seconds. Water will dispense continuously until the machine is completely empty, then stop automatically.
- Unplug the machine, remove the funnel, funnel cover and water tank, dry them both throughly and reinstall them on the machine.
- Your machine is now ready for storage. Pack the machine in its box, or enclose it in a bag to keep it dust free.
Error Codes
In the unlikely event of electrical component error or interruption during operation, the following codes will be displayed on the LCD screen. Pressing and holding the "stop" button will clear the code and operation should return to normal. If the code returns or is unable to be cleared, please contact Baby Brezza Customer Service.
 | Indicates an operation error of the motor that turns the powder container parts. Contact local Customer Service. |
 | Indicates an operation error of the motor sensor that detects the rotation of the measuring wheel. Contact local Customer Service. |
 | Indicates an operation error of the water flow meter that measures the water volume output. Contact local Customer Service. |
 | Indicates an operation error of the temperature sensor that measures water temperature. Contact local Customer Service. |
 | Indicates an operation error of the water level switch that measures the water remaining. Contact local Customer Service. |
 | Indicates that hot water has been poured into the water tank and entered the machine. Empty the water tank, refill it with room temperature water, return it to the base. Press & hold the "stop" button to clear the code, then press & hold the "water only" button to clear the hot water from the machine. |
 | Indicates that the powder container lid has been opened during operation. Make sure the powder container lid is completely closed, press & hold the "stop" button to clear the code. The machine will return to normal. |
 | Indicates that the funnel has been removed during operation. Make sure the funnel & funnel cover are Installed correctly, press & hold the "stop" button to clear the code. The machine will return to normal. |
